
A bag of wood ear is not a bag of oysters, and the difference costs you a month. Read the two checks below before you cut the plastic, and you skip the mistakes that flatten most home attempts.
Quick answer
Wood ear is a cool-room, slow jelly fungus, not an oyster. Leave the block in its bag, cut 2-4 narrow slits, hold 68-77°F and 85-95% humidity in a closed bin, and keep air moving. Expect seven to fourteen days to the first flush after opening, two or three flushes total. A dry block gives thin rubbery pins; a wet one gives grey mould.
What wood ear is, and what it is not
The crop in one line
Grown in a home kitchen, wood ear (Auricularia) is a slow, cool-room crop whose payoff is a crunchy, sauce-soaking ear in soups and stir-fries. Health claims are not what this page is.
| Wood ear | An oyster kit | |
|---|---|---|
| Temperature | 68-77°F, cool | warm rooms fine |
| Humidity | 85-95%, measured | often in the eighties |
| First flush | seven to fourteen days; six to eight weeks pre-colonised | often sold on ten days |
| Fruit body | gelatinous lobes off the side, no cap, no gills | a cap and gills on top |
| Flushes | two or three | three or four |
What this page covers
- A kitchen-scale guide for the edible jelly fungus wood ear, Auricularia auricula-judae and the closely related Auricularia heimuer.
- A grow-and-cook page. The goal is a harvest you put in a pan.
- The buying channel, honestly: as of October 2026 no wood ear grow kit is in stock on Amazon.
What it does not cover
- Not a wild foraging guide. Wild wood ear ID has real lookalikes and a real safety cost.
- Not a wellness or medical page. Nothing here makes health or nutrition claims.
- Not an outdoor log guide, which is a months-long project, and not a from-scratch lab manual. No sterile lab, no flow hood.
Scope: FungiAtHome covers gourmet edible species for the kitchen only. We do not cover or teach psychedelic species, and nothing here involves home chemistry.
What wood ear actually looks like
What wood ear actually is, structurally
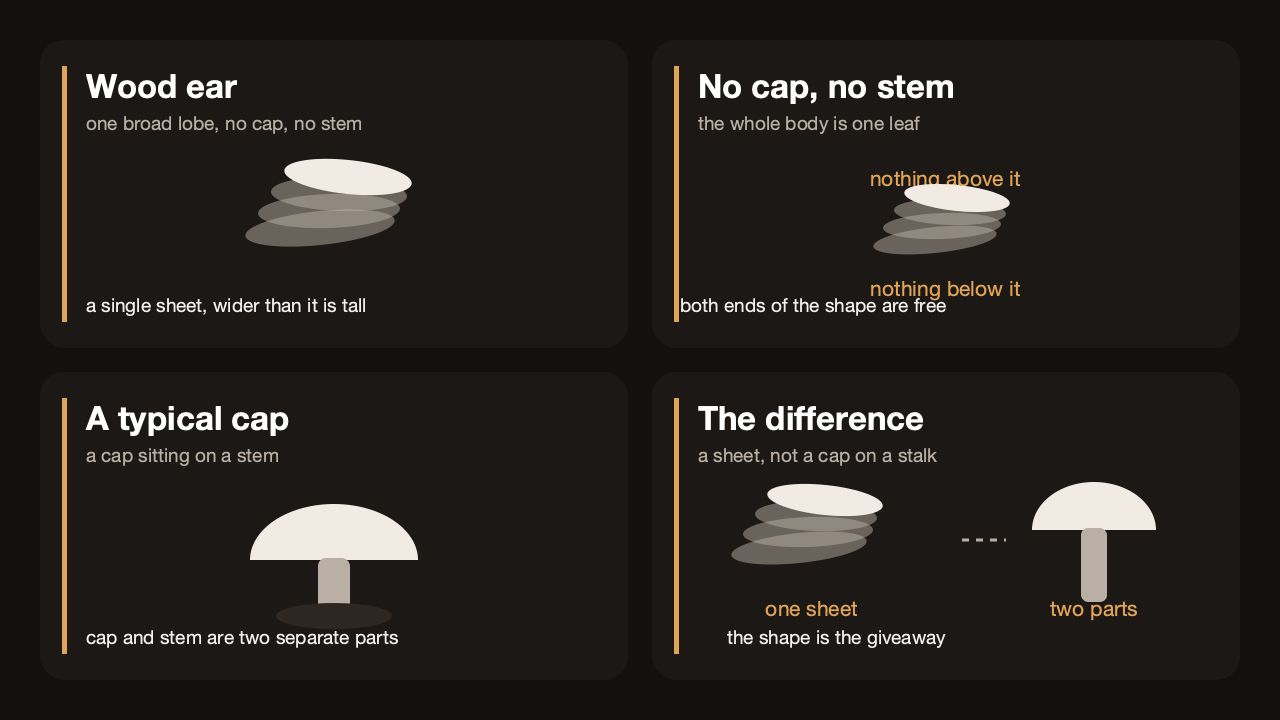
Wood ear is a jelly fungus, a different body plan from the gilled mushrooms most people picture. The fruiting body has no cap and no stem at all. It is one thin lobe, two to eight centimetres across, dark brown to near-black, gelatinous, floppy when wet. The upper face is velvety, with fine grey-white hairs you only see under a lens. The lower face carries pale veins. The habit is the giveaway: a dense, shelf-like cluster hanging off the side of the block.
Recognising a good ear
- Shape and surface: a rounded, ear-shaped or kidney-shaped lobe, floppy rather than rigid, dark and velvety above with a pale vein network underneath.
- Texture: rubbery-gelatinous when fresh. That is normal and it is the entire point.
- The surprise: a dried piece will rehydrate to several times its size in warm water, which is why it is sold dried.
Check the specimen in four places, in this order:
| Where to look | What a good ear shows | What rules it out |
|---|---|---|
| The whole lobe | one broad piece with a wavy outline, round to kidney-shaped, floppy rather than rigid | a scatter of small caps, each on its own stalk |
| The upper face | dark chestnut to near-black, dull rather than shiny, with a fine grey-white hair visible only under a lens | a wet glossy cap, or a smooth surface with no texture at all |
| The folded underside | pale grey to cream, carried on a low network of rounded veins that stay part of the flesh | thin separate blades with gaps between them, which is a gilled mushroom |
| The ruffled margin | a thin, wavy, slightly curled edge, translucent where the light catches it | a thick, hard, woody rim |
What it is not, and the three lookalikes
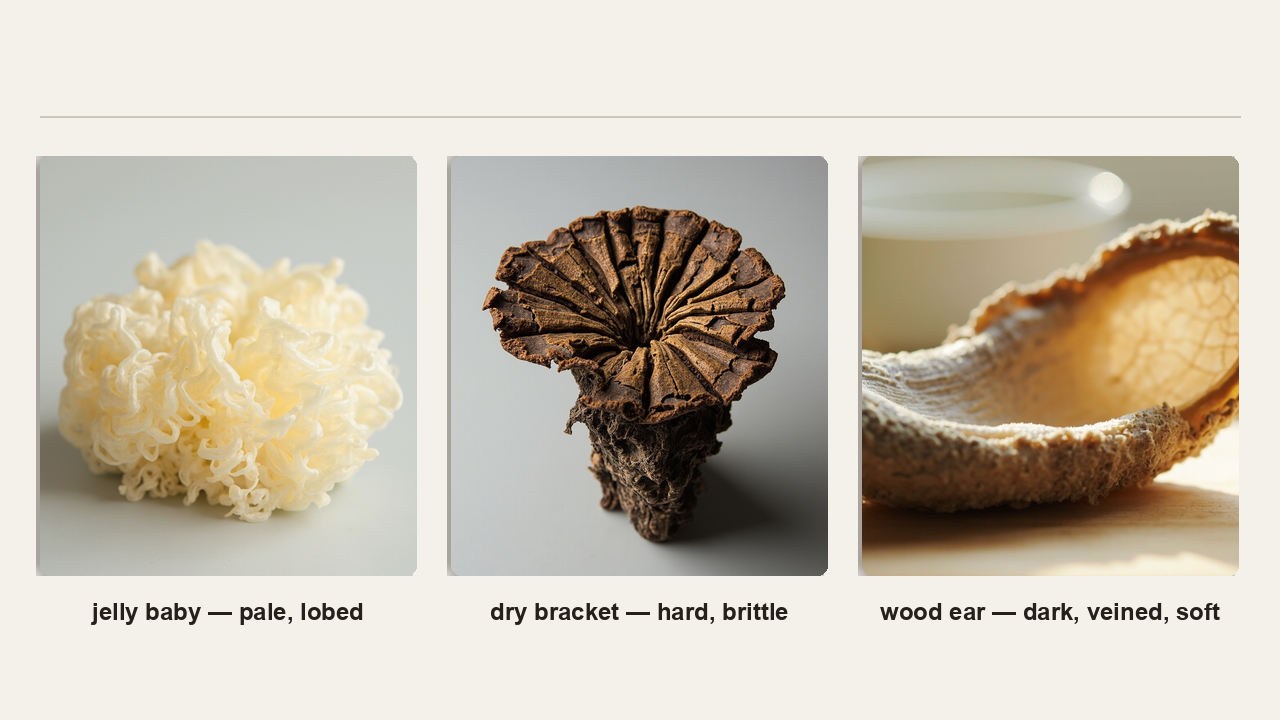
- Jelly baby or witch’s butter: pale yellow-white, lobed, wobbly. Never dark brown, never veined.
- Dry woody brackets: hard, matte, woody. Wood ear is always soft and pliable when fresh, so if it snaps like a twig, it is not wood ear.
- An oyster, always: if it has gills, it is an oyster. There’s no gilled version of wood ear.
Do this first
Before you cut anything, open the bag and answer one question: is this already colonised, or is it spawn?
- Solid white and dense, with clear gelatinous bumps pushing the plastic near the bottom - a colonised block. Go to Path A.
- A sealed jar or bag of loose grain, a syringe in the box, or nothing colonised yet - not a fruiting block. Don’t cut it, and don’t leave it on the counter for six weeks expecting ears. You need a wood ear liquid culture syringe and a substrate block, then Path B.
- Loose sawdust in a bag with an injection port, unopened or un-inoculated - substrate, not a crop. Get the culture first, such as a second-source syringe if the first is sold out, then Path B.
- Any green, black or orange colour, a sour-sweet fermentation smell, or a bag wet inside the plastic with no white growth - stop. Humidity does not fix contamination. Read if the bag has green, black or orange growth and start clean.
Decision tree
Root question: what did you actually buy?
Branch A - I have a pre-colonised block
- If the bag is solid white mycelium with gelatinous bumps under the plastic, then you can fruit it.
- If it shipped sealed and cool, then skip the “is it alive” panic. Ten days on a counter isn’t a failure.
- If the page said six to eight weeks to first flush, then that’s a real number. Don’t abandon the block on day twelve.
Branch B - I have spawn or culture
- If you have grain spawn or a culture syringe and no block, then this is Path B. A wood ear liquid culture syringe is the only wood-ear-specific grow product Amazon stocks.
- If you have substrate and no spawn, then you have a bag of soil, not a mushroom.
- If you want the fastest first harvest and don’t specifically care about wood ear, then start with an oyster kit.
Branch C - Something already looks wrong
- If nothing has appeared after fourteen days inside the temperature and humidity range, then it is almost always humidity below the gate, complete darkness, or stagnant air with carbon dioxide building up. Fix one first. If nothing pins at all is worth a read.
- If the block shrank, darkened and dried after the second or third flush, then that is the normal end state.
- If the bag has green, black or orange growth, then it is contamination. See what green mould looks like on a kit.
Branch D - I want this to be a ten-day project
Wood ear takes twenty-eight to thirty-five days to colonise, then seven to fourteen days to first flush from spawn, and six to eight weeks pre-colonised. If that timeline is wrong for you, if you want a ten-day harvest instead is the honest page.
Path A: From a ready-to-fruit block
Measured in October 2026: about ten specialist retailers sell wood ear kits, and Amazon carries none in stock. What arrives is a pre-inoculated sawdust bag plus instructions, so you still need a bin, a mister and a hygrometer.
Open the right way
Cut the plastic; don’t tear the block out. Make 2-4 slits about 1.5-2 inches long. The slits are the fruiting sites, and the bag itself is the humidity chamber. One wide window lets humidity escape and dries the sides of the block. How a ready-to-fruit kit works is worth ten minutes for a first block.
Before you fruit, check the bag is set up the way it should be:
| Check | What it should look like |
|---|---|
| Position | the bag lying on its side with its long face upward, so the ears come out sideways rather than off the top |
| The slits | narrow cuts, each one separate, none of them running together into a single wide opening |
| What grows from them | flat ear lobes layered against the side of the block, wider than they are tall |
| The bag mouth | pinched and knotted shut, never peeled back open |
Give it a humid bin
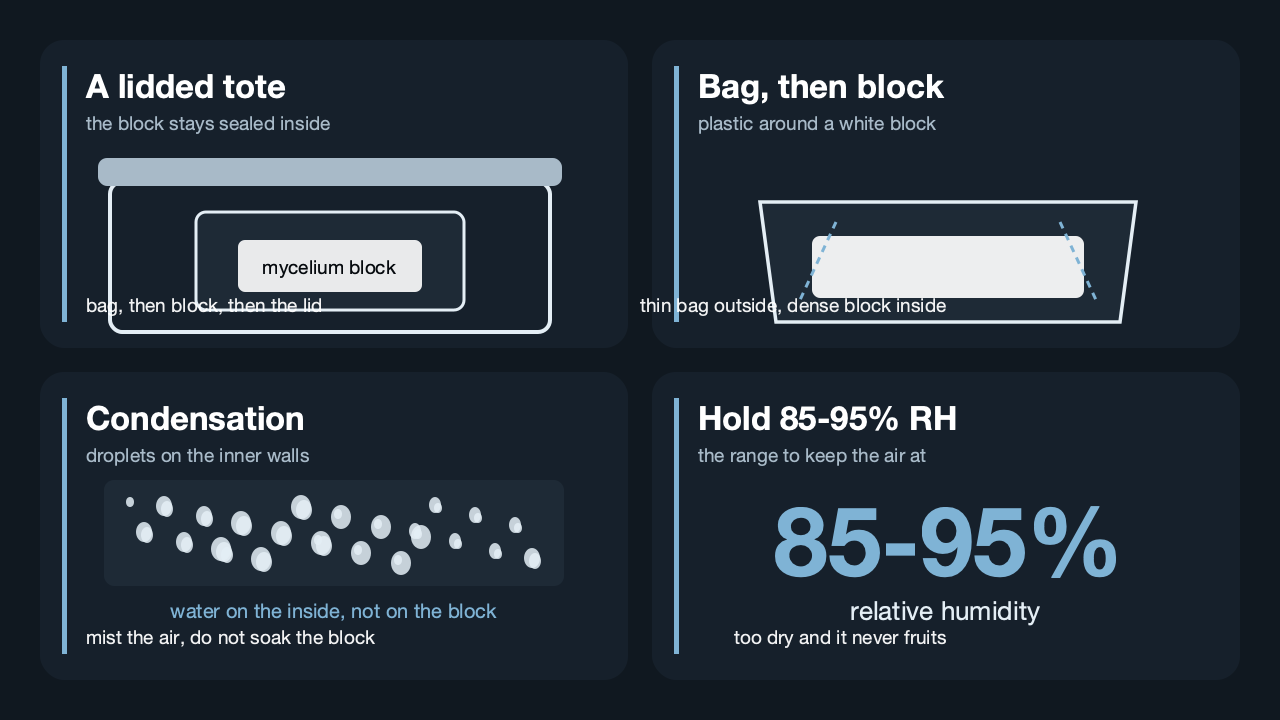
Most home attempts fail here: the block is a sponge, the room a desert. Put the bag in a sealed tote, mist the walls rather than the block, and hold the humidity gate. A continuous fine mister aimed at the walls does that without soaking the substrate, and the full humidity setup has the rest.
Keep it cool and give it air
Stay in that fruiting range. Above its ceiling the ears come out thin and soft, and well above that fruiting stalls. Wood ear doesn’t need a cold shock to pin: that’s a shiitake step, and people ruin blocks by refrigerating them to “trigger” it. It does need moving air, so a small fan on low or a filtered lid opening keeps carbon dioxide from pooling. A thermo-hygrometer reads both numbers.
Wait, and watch the translucent bumps
Before you cut, a colonised bag often shows translucent gelatinous bumps under the plastic, which is the block saying it is ready. From a pre-inoculated kit the retailer figure is six to eight weeks to first flush; from spawn, seven to fourteen days after you move a colonised block into the bin. Log both dates.
Harvest the cluster, not the ear
Wood ear fruits as a dense, shelf-like cluster off the side of the block. Cut the whole cluster off at the base, not lobe by lobe, or you tear the substrate and lose the next flush. The generic cues for when a mushroom is ready to pick apply, but the oyster “twist and it comes free” test does not.
Where the blades go decides whether the block survives:
| Where the blades go | What you should see afterwards |
|---|---|
| Flat against the base, where the cluster actually attaches to the block | a clean, flat face left on the block, no stub and no torn fibres |
| Through the whole cluster in a single pass | one piece that includes every lobe, not a handful of loose fronds |
| Not into the middle of the cluster | no cut-off stump left behind to rot and go green |
Path B: From spawn or bags
Given the empty kit channel, this is the state most readers are actually in: grain spawn, a culture syringe, or an un-inoculated substrate bag.
- Substrate. Wood ear wants hardwood, and oak and beech are the classics. An all-in-one hardwood grow block skips the mixing step, the most contamination-prone part of a first attempt. See when it’s worth moving onto bags and rehydrating hardwood pellets.
- Inoculate at roughly a tenth spawn rate by wet weight. The wood ear liquid culture syringe is the piece worth buying, and a second-source culture covers you if the first is out. Preparing grain spawn covers the grain side, and read about a clean bench before you clear a kitchen table and call it a workstation.
- Colonise at 73-81°F in near-darkness. Light above roughly five hundred lux can trigger premature primordia inside the bag before the block is ready. Full colonisation takes twenty-eight to thirty-five days.
- Fruit. Same as Path A from here: slits, the same temperature and humidity, no cold shock, whether your block is an all-in-one hardwood bag or your own mix.
Scope honesty: liquid culture from scratch, sterile lab work and log inoculation sit outside this page.
Conditions
Wood ear lives in the cool, humid, low-light corner of the edible spectrum.
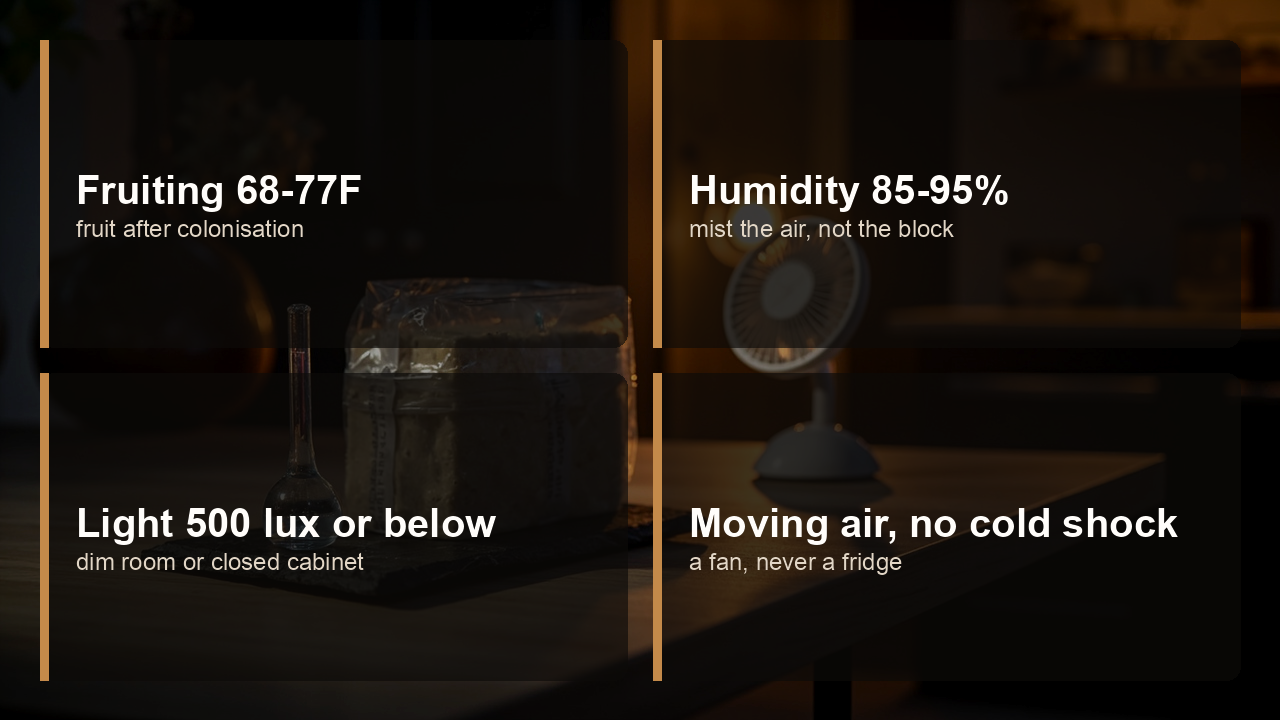
The four numbers that matter
- Fruiting temperature, 68-77°F. Cooler than an oyster; above the top of that range the ears come out thin and soft.
- Relative humidity, 85-95%. The hard gate. A digital thermo-hygrometer shows you where you are, and a fine mister aimed at the walls holds it there.
- Light, 500 lux or below during colonisation, rising only in the fruiting bin. Bright light at the wrong phase causes premature primordia inside the bag.
- Moving air, and no cold shock. A small fan on low, or a filtered gap in the lid. Refrigerating the block to trigger it belongs to another species.
Harvest, cook, and the second flush
Cut the cluster at the base
Wood ear is ready when the lobes are fully expanded, still dark and glossy, and still firm rather than floppy-thin. Because the fruit body is gelatinous it never feels dry or crisp.
Know when the block is finished
Expect two or three flushes. After the second or third, the block shrinks, the substrate darkens and looks dry, and no new primordia form. That’s the normal end state, and the generic second-flush procedure covers what to do while there’s still life in it.
What it tastes like in a pan
Wood ear is a texture ingredient: it drinks up broth and sauce rather than adding flavour of its own, which is why it’s worth growing even though dried wood ear keeps for a year. Salt it, simmer it briefly, and it carries whatever the pot says. If keeping the harvest is the question, dried mushroom storage containers and keeping fresh mushrooms are the right pages.

Common mistakes
Running it the oyster way
Cutting one big window, pulling the block bare out of the bag, or expecting fruit on top. Wood ear has no cap, no gills and no stem, and it fruits off the side. One wide opening is the commonest way to ruin it yourself.
Running it hot
A warm closet to “speed it up”, or a fridge to “trigger” pinning. Wood ear fruits in the cool range and doesn’t want a cold shock. Heat gives thin, soft fruit; a cold shock stalls it.
Guessing at humidity instead of measuring it
Misting because it feels dry and never checking. The requirement is the humidity gate, and a ten-dollar hygrometer is the difference between a full ear and a thin pin that never opens.
Over-misting the block instead of the air
Soaking the block, puddling water in the bag, or spraying the substrate directly. You’re humidifying the volume of air around the block, so mist the bin walls with a fine mister and keep the substrate’s own moisture even. A permanently wet bag invites grey mould.
Waiting past the end of the block
Keeping a spent block in the bin for a fourth flush because it is “still there”. After the second or third flush it shrinks, darkens and dries and stops setting primordia, and continuing to mist it is how bags get contaminated.
What you’ll need
Roles, not a shopping dump. Wood ear needs fewer products and more measurement than an oyster.
| Role | What it is | Why this species needs it |
|---|---|---|
| The culture | Wood ear liquid culture syringe or a second-source culture | The only wood-ear-specific grow product Amazon stocks. |
| The block | An all-in-one hardwood grow block, or a specialist-retailer pre-colonised block | Nothing starts the process. |
| A sealed bin or tote | Any clear box that closes | The block is a sponge. Cheapest, most load-bearing item. |
| A hygrometer | A digital thermo-hygrometer | You can’t hit the gate if you never measure it. |
| A mister | Continuous fine-mist bottles | Aim at the walls, never at the block. |
| Clean scissors | For slits and clusters | Clusters get cut, not pulled. |
| Airflow | A small fan on low, or a filtered lid opening | Stale air stops blocks from pinning. |
| Light (optional) | A bright window or low-output light | Only after colonisation, kept low. |
| A second block (optional) | A second hardwood block | One can colonise while the other fruits, so you never wait on an empty bin. |
Still deciding what to buy? How to choose a grow kit is honest about which species ship as kits.
Related species and guides
- If you want a ten-day harvest instead - the fastest path to food, and the honest pick if speed matters.
- How a ready-to-fruit kit works - the mechanism behind Path A.
- A clean inoculation bench - read it before Path B.
Key takeaways
- Wood ear is not an oyster: no cap, gills or stem, just a gelatinous, veined, ear-shaped lobe in dense clusters down the side of the block.
- The crop is slow and cool: twenty-eight to thirty-five days to colonise, seven to fourteen days to first flush, and it stays in that cool range the whole way.
- Humidity is the gate: below it you get thin rubbery pins, not ears, so measure.
- Cut two to four narrow slits and leave the block in the bag. A big window or a bare block ruins more crops than anything else.
- No cold shock. If it isn’t pinning the answer is humidity, darkness or stale air.
- Two or three flushes, then the block is done. Shrinkage is the end state, not a problem.
- No wood ear kit is in stock on Amazon as of October 2026, so know which purchase state you’re in before you spend.